Tuesday, 12 January 2016

WebLogic, Mission Control, remote Flight Recordings and iptables

Getting this mix to work under JDK8 is not well documented. There are a few limitations you have to run into first:

  • RMI data port is normally dynamic, unless configured to be fixed
  • RMI passwords are not set (obviously)
  • RMI access profile is insufficient for MissionControl
  • jmx.mbeanserver is started with insufficient rights for MissionControl

Here the sequence to get it working under WebLogic 12, in combination with JDK8

Open the iptables sufficiently:
## 8001-8010 = JVM open ports for rmi, Mission Control
## 8101-8110 = JVM open ports for rmi data, Mission Control
-A INPUT -p tcp -m state --state NEW -m tcp --dport 8001:8010 -j ACCEPT
-A INPUT -p tcp -m state --state NEW -m tcp --dport 8101:8110 -j ACCEPT

Add the following startup options to the Managed Server, in case no passwords are required:
-XX:+UnlockCommercialFeatures 
-XX:+FlightRecorder 
-Dcom.sun.management.jmxremote.port=8001 
-Dcom.sun.management.jmxremote.rmi.port=8101 
-Dcom.sun.management.jmxremote.ssl=false 
-Djavax.management.builder.initial=weblogic.management.jmx.mbeanserver.WLSMBeanServerBuilder 
-Dcom.sun.management.jmxremote.authenticate=false

Add the following startup options to the Managed Server, in case passwords are required:
-XX:+UnlockCommercialFeatures -XX:+FlightRecorder 
-Dcom.sun.management.jmxremote.port=8001 
-Dcom.sun.management.jmxremote.rmi.port=8101 
-Dcom.sun.management.jmxremote.ssl=false  
-Djavax.management.builder.initial=weblogic.management.jmx.mbeanserver.WLSMBeanServerBuilder 
-Dcom.sun.management.jmxremote.authenticate=true

Now we need the rmi access and password file set. The default access file is insuffient. Modify the file
$jdk_home/jre/lib/management/jmxremote.access
monitorRole   readonly
controlRole   readwrite \
              create javax.management.monitor.*,javax.management.timer.* \
              create com.sun.management.MissionControl \
              unregister

And we need to set a password, in case we set -Dcom.sun.management.jmxremote.authenticate=true, in file $jdk_home/jre/lib/management/jmxremote.password
monitorRole YourMonitorPasswordHere
controlRole YourControlPasswordHere

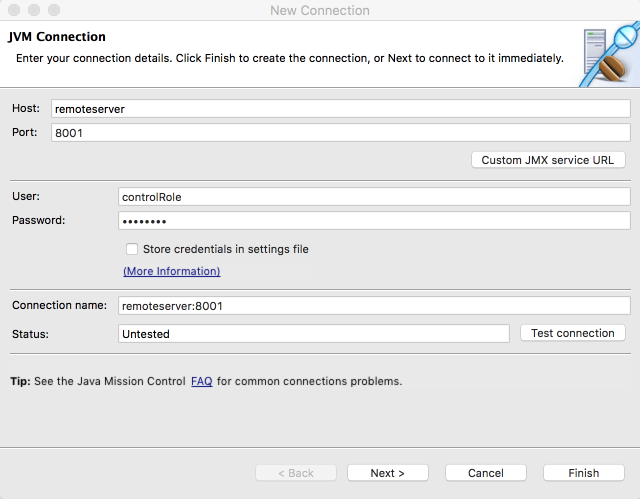
Now, you can connect and make Flight Recordings from remote:

Tuesday, 29 December 2015

Create OVS templates

Problem

The rebuild OracleLinux templates for OVS are perfect for a headstart: they have the OVS templates pre-configured. They are perfect, except for one small omission. They have been recently updated with some patches, updating the contents to a newer version then available on the installer (shipping) version. If you don't happen to have an internet connection to the public-yum.oracle.com, nor have a local (mirror) repo, you may find those templates unusable due to missing dependencies. Observe this:

[root@test ~]# yum install gcc
Loaded plugins: security, ulninfo
Setting up Install Process
Resolving Dependencies
--> Running transaction check
---> Package gcc.x86_64 0:4.4.7-16.el6 will be installed
--> Processing Dependency: libgomp = 4.4.7-16.el6 for package: gcc-4.4.7-16.el6.x86_64
--> Processing Dependency: cpp = 4.4.7-16.el6 for package: gcc-4.4.7-16.el6.x86_64
--> Processing Dependency: glibc-devel >= 2.2.90-12 for package: gcc-4.4.7-16.el6.x86_64
--> Processing Dependency: cloog-ppl >= 0.15 for package: gcc-4.4.7-16.el6.x86_64
--> Processing Dependency: libgomp.so.1()(64bit) for package: gcc-4.4.7-16.el6.x86_64
--> Running transaction check
---> Package cloog-ppl.x86_64 0:0.15.7-1.2.el6 will be installed
--> Processing Dependency: libppl_c.so.2()(64bit) for package: cloog-ppl-0.15.7-1.2.el6.x86_64
--> Processing Dependency: libppl.so.7()(64bit) for package: cloog-ppl-0.15.7-1.2.el6.x86_64
---> Package cpp.x86_64 0:4.4.7-16.el6 will be installed
--> Processing Dependency: libmpfr.so.1()(64bit) for package: cpp-4.4.7-16.el6.x86_64
---> Package glibc-devel.x86_64 0:2.12-1.166.el6 will be installed
--> Processing Dependency: glibc-headers = 2.12-1.166.el6 for package: glibc-devel-2.12-1.166.el6.x86_64
--> Processing Dependency: glibc = 2.12-1.166.el6 for package: glibc-devel-2.12-1.166.el6.x86_64
--> Processing Dependency: glibc-headers for package: glibc-devel-2.12-1.166.el6.x86_64
---> Package libgomp.x86_64 0:4.4.7-16.el6 will be installed
--> Running transaction check
---> Package glibc.i686 0:2.12-1.166.el6 will be installed
--> Processing Dependency: glibc-common = 2.12-1.166.el6 for package: glibc-2.12-1.166.el6.i686
--> Processing Dependency: libfreebl3.so(NSSRAWHASH_3.12.3) for package: glibc-2.12-1.166.el6.i686
--> Processing Dependency: libfreebl3.so for package: glibc-2.12-1.166.el6.i686
---> Package glibc-headers.x86_64 0:2.12-1.166.el6 will be installed
--> Processing Dependency: kernel-headers >= 2.2.1 for package: glibc-headers-2.12-1.166.el6.x86_64
--> Processing Dependency: kernel-headers for package: glibc-headers-2.12-1.166.el6.x86_64
---> Package mpfr.x86_64 0:2.4.1-6.el6 will be installed
---> Package ppl.x86_64 0:0.10.2-11.el6 will be installed
--> Running transaction check
---> Package glibc.i686 0:2.12-1.166.el6 will be installed
--> Processing Dependency: glibc-common = 2.12-1.166.el6 for package: glibc-2.12-1.166.el6.i686
---> Package kernel-headers.x86_64 0:2.6.32-573.el6 will be installed
---> Package nss-softokn-freebl.i686 0:3.14.3-22.el6_6 will be installed
--> Finished Dependency Resolution
Error: Package: glibc-2.12-1.166.el6.i686 (local)
           Requires: glibc-common = 2.12-1.166.el6
           Installed: glibc-common-2.12-1.166.el6_7.1.x86_64 (installed)
               glibc-common = 2.12-1.166.el6_7.1
           Available: glibc-common-2.12-1.166.el6.x86_64 (local)
               glibc-common = 2.12-1.166.el6
You could try using --skip-broken to work around the problem
You could try running: rpm -Va --nofiles --nodigest
[root@test ~]#

The glib-common has been replaced from the shipping media default 2.12-1.166.el6 to 2.12-1.166.el6_7.1.

Solution

We create our own template, based on the installer media, available to us.

Preparation

Install a default server, having a NIC and a 12G new virtual disk. Using the ISO installer, e.g. we install OL6.7 here.

  • Install without configuring a network
  • Set timezone to Europe/Amsterdam
  • Set a temp root password (anything except empty string)
  • Create custom layout
    • 200M /boot partition (force primary)
    • 1G swap partition (force primary)
    • remaining space /root partition (force primary)
  • Install bootloader into /dev/xvda
  • Install Basic Server

At the end of the install process (after reboot), stop the machine.

Configuration


We now have a disk, which we can mount at any other (existing) machine as an additional disk. On that machine, we can chroot to further prepare the machine.

  • Deattach the disk from the default server
  • Attach the disk to another (already running/configured) machine
# See it being attached, make note of the disk name, here xvdc: we need the third partition.
dmesg|tail
blkfront: xvdc: flush diskcache: enabled; persistent grants: enabled; indirect descriptors: enabled;
xvdc: xvdc1 xvdc2 xvdc3

Now we can configure this disk.

mydisk=/dev/xvdc3
mymount=/media/mytemplate
myarch=x86_64 # alternative=i386
mypackages="libovmapi libovmapi-devel ovmd python-simplejson xenstoreprovider ovm-template-config  ovm-template-config-authentication ovm-template-config-datetime ovm-template-config-firewall ovm-template-config-network ovm-template-config-selinux ovm-template-config-ssh ovm-template-config-system ovm-template-config-user libovmapi xenstoreprovider ovmd python-simplejson xenstoreprovider oracle-rdbms-server-12cR1-preinstall wget dos2unix zip unzip screen nc expect"
# mount the disks
mkdir -p ${mymount}
mount ${mydisk} ${mymount}
# Add the resolver
echo "search local" > ${mymount}/etc/resolv.conf
echo "nameserver 192.186.2.2" >> ${mymount}/etc/resolv.conf
echo "nameserver 192.186.2.4" >> ${mymount}/etc/resolv.conf
# Change the public-yum to point to public-yum.local
sed -i'' -e's/oracle.com/local/g' ${mymount}/etc/yum.repos.d/public-yum-ol6.repo
# Change root into the disk, using x86_64 architecture, and install software ovm template
chroot ${mymount} /usr/bin/setarch ${myarch} yum --assumeyes --enablerepo=*addons install ${mypackages}
# Disable selinux
sed -i'' -e's/SELINUX=enforcing/SELINUX=disabled/g' ${mymount}/etc/sysconfig/selinux
# Disable iptables
chroot ${mymount} chkconfig iptables off
chroot ${mymount} chkconfig ip6tables off
# Configure the OVM template initial run
sed -i -e's/INITIAL_CONFIG=no/INITIAL_CONFIG=yes/g' ${mymount}/etc/sysconfig/ovmd
# Add user agent12c as example. It makes sense to add the shared key for oracle and root too.
chroot ${mymount} useradd -G dba agent12c
chroot ${mymount} su - agent12c -c "mkdir .ssh;chmod 700 .ssh;touch .ssh/authorized_keys; chmod 700 .ssh/authorized_keys"
echo "ssh-rsa AAAAB3NzaC1yc2EAAAABIwAAAQEAqmwDETdBnHx4J1+JHRJsAhgJ+R//+6UsQMSO+ih0yPBn9txv1SaoIwEsYKyakQyx6y4Du1wn3gV68q2xB0p3cP7w+FjGNEXQsZtqlN6qRFvkiWwzce7I1vV8DucpHuySFtVaZlMh/bRAa3etEm3ew/XMX1xuchCFl4jcpigvGcVTxLkCffg5Mcti/6SJvQs8amTB09cVsxgnwbgAu/xAww+w4m+EiwcfgaaHyQxO17qXEee37uLlFaKnurX3UA+qg984UF6N6i4Ijfz53gWcQv1CawFIec8wEBu8Ylb+T2mPwJBdkK+YIe0VBVx9hbEFtPYz4n2fTSPxyVRnyptxPw== agent12c@spc.local" >> ${mymount}/home/agent12c/.ssh/authorized_keys
# Add agent12c to sudoers
echo "" >> ${mymount}/etc/sudoers
echo "agent12c ALL=(ALL) NOPASSWD:ALL" >> ${mymount}/etc/sudoers
# Disable tty requirement
sed -i'' -e's/^Defaults\ \ \ \ requiretty/#\0/g' ${mymount}/etc/sudoers
# Clear settings
chroot ${mymount} /usr/bin/setarch ${myarch} yum clean all
rm -fR ${mymount}/tmp/*
rm -fR ${mymount}/root/.bash_history
# unmount the disks
umount ${mymount}
rmdir ${mymount}

Finalizing


All we now have to do, is create a OVS template of the disk.
  • Deattach the disk from the running/configured machine
  • Reattach it the default machine
  • Create a new OVM template, based on the default machine
Tuesday, 12 January 2016

WebLogic, Mission Control, remote Flight Recordings and iptables

Getting this mix to work under JDK8 is not well documented. There are a few limitations you have to run into first:

  • RMI data port is normally dynamic, unless configured to be fixed
  • RMI passwords are not set (obviously)
  • RMI access profile is insufficient for MissionControl
  • jmx.mbeanserver is started with insufficient rights for MissionControl

Here the sequence to get it working under WebLogic 12, in combination with JDK8

Open the iptables sufficiently:
## 8001-8010 = JVM open ports for rmi, Mission Control
## 8101-8110 = JVM open ports for rmi data, Mission Control
-A INPUT -p tcp -m state --state NEW -m tcp --dport 8001:8010 -j ACCEPT
-A INPUT -p tcp -m state --state NEW -m tcp --dport 8101:8110 -j ACCEPT

Add the following startup options to the Managed Server, in case no passwords are required:
-XX:+UnlockCommercialFeatures 
-XX:+FlightRecorder 
-Dcom.sun.management.jmxremote.port=8001 
-Dcom.sun.management.jmxremote.rmi.port=8101 
-Dcom.sun.management.jmxremote.ssl=false 
-Djavax.management.builder.initial=weblogic.management.jmx.mbeanserver.WLSMBeanServerBuilder 
-Dcom.sun.management.jmxremote.authenticate=false

Add the following startup options to the Managed Server, in case passwords are required:
-XX:+UnlockCommercialFeatures -XX:+FlightRecorder 
-Dcom.sun.management.jmxremote.port=8001 
-Dcom.sun.management.jmxremote.rmi.port=8101 
-Dcom.sun.management.jmxremote.ssl=false  
-Djavax.management.builder.initial=weblogic.management.jmx.mbeanserver.WLSMBeanServerBuilder 
-Dcom.sun.management.jmxremote.authenticate=true

Now we need the rmi access and password file set. The default access file is insuffient. Modify the file
$jdk_home/jre/lib/management/jmxremote.access
monitorRole   readonly
controlRole   readwrite \
              create javax.management.monitor.*,javax.management.timer.* \
              create com.sun.management.MissionControl \
              unregister

And we need to set a password, in case we set -Dcom.sun.management.jmxremote.authenticate=true, in file $jdk_home/jre/lib/management/jmxremote.password
monitorRole YourMonitorPasswordHere
controlRole YourControlPasswordHere

Now, you can connect and make Flight Recordings from remote:

Tuesday, 29 December 2015

Create OVS templates

Problem

The rebuild OracleLinux templates for OVS are perfect for a headstart: they have the OVS templates pre-configured. They are perfect, except for one small omission. They have been recently updated with some patches, updating the contents to a newer version then available on the installer (shipping) version. If you don't happen to have an internet connection to the public-yum.oracle.com, nor have a local (mirror) repo, you may find those templates unusable due to missing dependencies. Observe this:

[root@test ~]# yum install gcc
Loaded plugins: security, ulninfo
Setting up Install Process
Resolving Dependencies
--> Running transaction check
---> Package gcc.x86_64 0:4.4.7-16.el6 will be installed
--> Processing Dependency: libgomp = 4.4.7-16.el6 for package: gcc-4.4.7-16.el6.x86_64
--> Processing Dependency: cpp = 4.4.7-16.el6 for package: gcc-4.4.7-16.el6.x86_64
--> Processing Dependency: glibc-devel >= 2.2.90-12 for package: gcc-4.4.7-16.el6.x86_64
--> Processing Dependency: cloog-ppl >= 0.15 for package: gcc-4.4.7-16.el6.x86_64
--> Processing Dependency: libgomp.so.1()(64bit) for package: gcc-4.4.7-16.el6.x86_64
--> Running transaction check
---> Package cloog-ppl.x86_64 0:0.15.7-1.2.el6 will be installed
--> Processing Dependency: libppl_c.so.2()(64bit) for package: cloog-ppl-0.15.7-1.2.el6.x86_64
--> Processing Dependency: libppl.so.7()(64bit) for package: cloog-ppl-0.15.7-1.2.el6.x86_64
---> Package cpp.x86_64 0:4.4.7-16.el6 will be installed
--> Processing Dependency: libmpfr.so.1()(64bit) for package: cpp-4.4.7-16.el6.x86_64
---> Package glibc-devel.x86_64 0:2.12-1.166.el6 will be installed
--> Processing Dependency: glibc-headers = 2.12-1.166.el6 for package: glibc-devel-2.12-1.166.el6.x86_64
--> Processing Dependency: glibc = 2.12-1.166.el6 for package: glibc-devel-2.12-1.166.el6.x86_64
--> Processing Dependency: glibc-headers for package: glibc-devel-2.12-1.166.el6.x86_64
---> Package libgomp.x86_64 0:4.4.7-16.el6 will be installed
--> Running transaction check
---> Package glibc.i686 0:2.12-1.166.el6 will be installed
--> Processing Dependency: glibc-common = 2.12-1.166.el6 for package: glibc-2.12-1.166.el6.i686
--> Processing Dependency: libfreebl3.so(NSSRAWHASH_3.12.3) for package: glibc-2.12-1.166.el6.i686
--> Processing Dependency: libfreebl3.so for package: glibc-2.12-1.166.el6.i686
---> Package glibc-headers.x86_64 0:2.12-1.166.el6 will be installed
--> Processing Dependency: kernel-headers >= 2.2.1 for package: glibc-headers-2.12-1.166.el6.x86_64
--> Processing Dependency: kernel-headers for package: glibc-headers-2.12-1.166.el6.x86_64
---> Package mpfr.x86_64 0:2.4.1-6.el6 will be installed
---> Package ppl.x86_64 0:0.10.2-11.el6 will be installed
--> Running transaction check
---> Package glibc.i686 0:2.12-1.166.el6 will be installed
--> Processing Dependency: glibc-common = 2.12-1.166.el6 for package: glibc-2.12-1.166.el6.i686
---> Package kernel-headers.x86_64 0:2.6.32-573.el6 will be installed
---> Package nss-softokn-freebl.i686 0:3.14.3-22.el6_6 will be installed
--> Finished Dependency Resolution
Error: Package: glibc-2.12-1.166.el6.i686 (local)
           Requires: glibc-common = 2.12-1.166.el6
           Installed: glibc-common-2.12-1.166.el6_7.1.x86_64 (installed)
               glibc-common = 2.12-1.166.el6_7.1
           Available: glibc-common-2.12-1.166.el6.x86_64 (local)
               glibc-common = 2.12-1.166.el6
You could try using --skip-broken to work around the problem
You could try running: rpm -Va --nofiles --nodigest
[root@test ~]#

The glib-common has been replaced from the shipping media default 2.12-1.166.el6 to 2.12-1.166.el6_7.1.

Solution

We create our own template, based on the installer media, available to us.

Preparation

Install a default server, having a NIC and a 12G new virtual disk. Using the ISO installer, e.g. we install OL6.7 here.

  • Install without configuring a network
  • Set timezone to Europe/Amsterdam
  • Set a temp root password (anything except empty string)
  • Create custom layout
    • 200M /boot partition (force primary)
    • 1G swap partition (force primary)
    • remaining space /root partition (force primary)
  • Install bootloader into /dev/xvda
  • Install Basic Server

At the end of the install process (after reboot), stop the machine.

Configuration


We now have a disk, which we can mount at any other (existing) machine as an additional disk. On that machine, we can chroot to further prepare the machine.

  • Deattach the disk from the default server
  • Attach the disk to another (already running/configured) machine
# See it being attached, make note of the disk name, here xvdc: we need the third partition.
dmesg|tail
blkfront: xvdc: flush diskcache: enabled; persistent grants: enabled; indirect descriptors: enabled;
xvdc: xvdc1 xvdc2 xvdc3

Now we can configure this disk.

mydisk=/dev/xvdc3
mymount=/media/mytemplate
myarch=x86_64 # alternative=i386
mypackages="libovmapi libovmapi-devel ovmd python-simplejson xenstoreprovider ovm-template-config  ovm-template-config-authentication ovm-template-config-datetime ovm-template-config-firewall ovm-template-config-network ovm-template-config-selinux ovm-template-config-ssh ovm-template-config-system ovm-template-config-user libovmapi xenstoreprovider ovmd python-simplejson xenstoreprovider oracle-rdbms-server-12cR1-preinstall wget dos2unix zip unzip screen nc expect"
# mount the disks
mkdir -p ${mymount}
mount ${mydisk} ${mymount}
# Add the resolver
echo "search local" > ${mymount}/etc/resolv.conf
echo "nameserver 192.186.2.2" >> ${mymount}/etc/resolv.conf
echo "nameserver 192.186.2.4" >> ${mymount}/etc/resolv.conf
# Change the public-yum to point to public-yum.local
sed -i'' -e's/oracle.com/local/g' ${mymount}/etc/yum.repos.d/public-yum-ol6.repo
# Change root into the disk, using x86_64 architecture, and install software ovm template
chroot ${mymount} /usr/bin/setarch ${myarch} yum --assumeyes --enablerepo=*addons install ${mypackages}
# Disable selinux
sed -i'' -e's/SELINUX=enforcing/SELINUX=disabled/g' ${mymount}/etc/sysconfig/selinux
# Disable iptables
chroot ${mymount} chkconfig iptables off
chroot ${mymount} chkconfig ip6tables off
# Configure the OVM template initial run
sed -i -e's/INITIAL_CONFIG=no/INITIAL_CONFIG=yes/g' ${mymount}/etc/sysconfig/ovmd
# Add user agent12c as example. It makes sense to add the shared key for oracle and root too.
chroot ${mymount} useradd -G dba agent12c
chroot ${mymount} su - agent12c -c "mkdir .ssh;chmod 700 .ssh;touch .ssh/authorized_keys; chmod 700 .ssh/authorized_keys"
echo "ssh-rsa AAAAB3NzaC1yc2EAAAABIwAAAQEAqmwDETdBnHx4J1+JHRJsAhgJ+R//+6UsQMSO+ih0yPBn9txv1SaoIwEsYKyakQyx6y4Du1wn3gV68q2xB0p3cP7w+FjGNEXQsZtqlN6qRFvkiWwzce7I1vV8DucpHuySFtVaZlMh/bRAa3etEm3ew/XMX1xuchCFl4jcpigvGcVTxLkCffg5Mcti/6SJvQs8amTB09cVsxgnwbgAu/xAww+w4m+EiwcfgaaHyQxO17qXEee37uLlFaKnurX3UA+qg984UF6N6i4Ijfz53gWcQv1CawFIec8wEBu8Ylb+T2mPwJBdkK+YIe0VBVx9hbEFtPYz4n2fTSPxyVRnyptxPw== agent12c@spc.local" >> ${mymount}/home/agent12c/.ssh/authorized_keys
# Add agent12c to sudoers
echo "" >> ${mymount}/etc/sudoers
echo "agent12c ALL=(ALL) NOPASSWD:ALL" >> ${mymount}/etc/sudoers
# Disable tty requirement
sed -i'' -e's/^Defaults\ \ \ \ requiretty/#\0/g' ${mymount}/etc/sudoers
# Clear settings
chroot ${mymount} /usr/bin/setarch ${myarch} yum clean all
rm -fR ${mymount}/tmp/*
rm -fR ${mymount}/root/.bash_history
# unmount the disks
umount ${mymount}
rmdir ${mymount}

Finalizing


All we now have to do, is create a OVS template of the disk.
  • Deattach the disk from the running/configured machine
  • Reattach it the default machine
  • Create a new OVM template, based on the default machine